CS108 Project 2: Classifying Retinal Images
Due Monday, April 22, at 9:00 AM
The retina is divided into plexiform (connection) and nuclear (neuron body) layers, as shown in the image below:
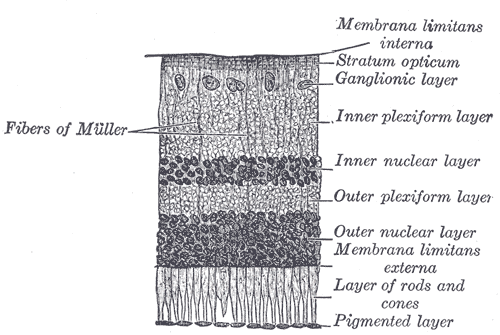
Light passes through the layers to the layer of rods and cones, which is sensitive to light. Information is passed through the other layers, with some processing and refinement at each step, before it is delivered to the brain via the optic nerve.
Note the difference in character between plexiform and nuclear layers in the picture above. The difference is evident to a human observer, and your task for this project is to develop an automated system to determine which part of the retina a small image is from.
Download the images from the class examples area. Ten small images are provided, nuclear 1 through 5 and plexiform 1 through 5. These have been extracted from BAX_ko.png, which is a high-resolution electron microscope image of a BAX-knockout mouse retina. The mouse was raised in Moscow, ID, and the retina delivered to Renovo Neural for imaging. The image is part of a 600-image stack, which is being used study the effects of disabling the BAX gene.
Note that in the BAX_ko.png image, the plexiform layer (in the middle, the image is sideways compared to the textbook image above) is distinct in that it contains a high density of membranes (cell walls). As such, it should be possible to classify the small images as belonging to either a nuclear or plexiform layer according to the amount of cell wall inside the image.
Programming Steps
In brief, your program should contain three functions:
- void setup() will set the window size to 800 by 800 (the size of a small image), and load an image
- void draw() will draw the current image
- void mouseClicked() will determine which layer the image is from
If you need a quick review of image processing in Processing, read the tutorial here:
https://processing.org/tutorials/pixels/
mouseClicked will do the following (feel free to change details to suit your preference, provided your solution works):
- Create a new image, called newimg. Use createImage for that
- Call loadPixels on the new image and the original image. This prepares the .pixels array for use.
- Start a count of pixels which were membrane out at 0. This can be a local variable.
- Use a for loop to examine each pixel. If the pixel is dark enough, set the matching pixel in the new image to a color to mark it as membrane, and increment the count of membrane pixels. Otherwise (not dark enough), set the matching pixel in the new image to be the same as the color in the old image.
- Set old image to be the new image, so that draw() will display the modified image with colored membranes.
- If the count is high enough, the image is from the plexiform layer. If not, it's from the nuclear layer.
Regarding "dark enough" for the pixel and "high enough" for the count: You'll have to figure out these numbers by trial and error. You can figure out how dark a pixel is like this:
int darkness = int(blue(img.pixels[pixel_index]));
"red" or "green" would have worked as well, since the image isn't in color. Red, green, and blue are all the same, so any can be picked. If you have x and y coordinates to work with, you can get a pixel index like this:
int pixel_index = x + y * width;
To set a pixel in the new image to be the same as one in the old image, assuming you have "darkness" as above, you can set red, green, and blue to the original darkness:
newimg.pixels[pixel_index] = color(darkness, darkness, darkness);
Analysis and Hypothesis
Write a hypothesis related to this problem. Note that although you can construct a hypothesis which will be proven if the program works, it is difficult to construct one that will be rejected if it does not. Don't be overly concerned with this. It is, in general, difficult to prove that something is impossible to do (further reading, not required). Your hypothesis should be well-supported if the program works. Put your hypothesis, and a detailed description of your results in your project report. Be sure to include how you determined "dark enough" for pixels and "high enough" for the membrane pixel count.
Summary of Project Report
Your report should have the following 4 sections, with the following point values:
- Introduction (10 points)
- Hypothesis. Explain why your hypothesis is reasonable here. (40 points)
- Code (20 points)
- Results, and support or lack of it for the hypothesis (30 points)
Deliverables
Project report and source code.